|
|
|
 |
 |
| 5.3 Creating
Views |
| |
The predefined views may not show the information that you
actually want to see. You can create your own views using the "View Manager"
or from within the query forms. |
Creating
Views with the Query Forms |
| |
Both the "Standard" and "Extended" query forms provide a
mechanism for specifying the data fields that should be displayed in the
"Entry List" that is returned by the query.
Creating Views from the "Standard" Query Form
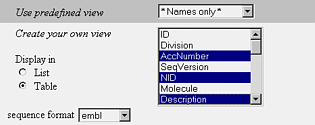
The bottom half of the "Standard" query form has a section called "Create
your own view", that lets you specify how the results of the query should
be displayed. You can either use the default view, one of the predefined
views (as was explained in the previous section), or you can design your
own view. See figure 12.

FIGURE 12. Create your own view in the Query Window
To design your own view:
-
Select the data fields in the list that you want displayed.
-
Choose the layout that you want from the "Display in" section.
-
Your choices are "List" or "Table".
-
Complete the query as normal.
-
The results will be displayed in the "Entry List" page as specified.
Creating Views from the "Extended" Query Form
To the right of the input field, (see figure 13) is a checkbox that is
used to tell SRS to include a field in the results. You do not have to
enter a search term in a field to have it included in the results.

FIGURE 13. Select the fields to include in the "Entry List".
To create a view in the "Extended" query from:
-
Enter your search term as usual.
-
See chapter 3. "Querying" for details.
-
Select the checkbox to the right of the data fields for any fields that
you want displayed in the results.
-
Continue with your query as usual.
|
Creating
Views with the "View Manager" |
| |
Users can create new views that will be added to the list
of available views whenever appropriate. Views are created from the "View"
tab in the top banner of the interface. A user can control the following
for the views they create:
-
A list of databanks the view is applied to (and therefore available for).
These are called "Root Libraries".
-
A list of databanks that may have a link with the entries in the
"Entry List".
-
A list of fields from the "Root Libraries" and the linked databanks
that should be displayed.
-
The format of some fields such as "Sequences".
-
Whether the view is displayed as a list or a table.
-
The name of the view.
In selecting the "Root Libraries" for a view, you specify two important
things. First, the view will only be available for queries and result sets
of a subset of these databanks. Secondly, the available fields from the
"Root Libraries" will be those that are common across all of the "Root
Library" selections. Therefore, it is useful to select only databanks that
are close to each other when you are creating a new view.
To Create a new View
-
Click on the "View" tab.
-
Select the databanks for which the view will be available in the left column
of databanks. These are the "Root Libraries" for the view.
-
Select the link databanks.
-
Name the view.
-
Enter the name in the "View name:" input field.
-
Click on the "Create New View" button. See figure 14.

FIGURE 14. Create your own view with the View Manager
-
You will now have a page to select the specific fields for your view. The
top box contains the common fields among all of the "Root Libraries" you
selected in the previous page. There are additional boxes below this for
each linked database you selected on the previous page. From these boxes,
select the fields that you would like to see in your view by checking the
appropriate checkbox.
-
On this page you can also control the following:
-
The view layout, it can be displayed as a "Table" or "List".
-
The view name.
-
If "full" or "short" field names are used in the table headings.
-
Click on Save View. You have just completed the creation of a new view.
See figure 15.

FIGURE 15. Select the data fields to include in your view
Try your new view by performing a new query on one or more of the "Root
Libraries" in your new view.
To Edit an Existing View
The "View Manager" is used when you want to edit an existing view. This
is particularly useful when you want to:
-
Make a view available to additional databanks (Root Libraries).
-
Change or add fields to the view.
-
Rename a view.
The process of editing a view is similar to that of creating a new view.
To edit a view:
-
Click on the "View" tab.
-
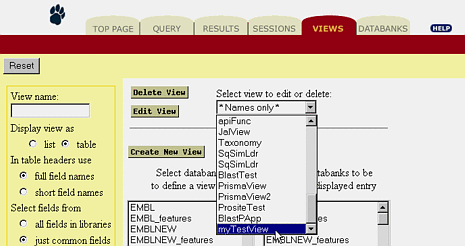
Select the view that you would like to edit from the pull-down menu.
-
Click the "Edit" button.

FIGURE 16. Select the view to edit
-
Make any changes to the set of "Root Libraries" or linked databanks and
click "Select Fields" button.
-
Make any changes to the set of fields used in the view, and click on "Save
View".

FIGURE 17. Change the view and click "Save View".
Once you have created a view you can use it the same way that you use the
predefined views. See the "Using Views" section in this chapter for details. |
 |