| |
Following are instructions for applying views to your query
results. Each is given as a mini tutorial. In the first two you will begin
by querying a databank and setting the query options for views so that
the query results are displayed with your chosen view. The others show
how to apply to an already existing set.
From the "Standard" query form
To apply a view from the "Standard" query form:
-
Select the EMBL databank checkbox from the "Top" page and click the "Standard"
button. See chapter 3, "Querying" if necessary.
-
Enter "oxidase" in the input box. The default "AllText" data field is fine.
-
Select the view you would like from the pull-down menu beside the heading
"Use predefined view". See figure 1.
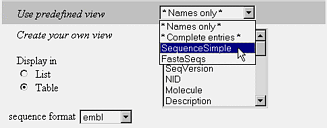
FIGURE 1. Choose a predefined view for your "Standard" query.
-
Click on Submit Query.
-
This will bring up the "Entry List" page with the results of your query
displayed using the selected view. See figure 2.
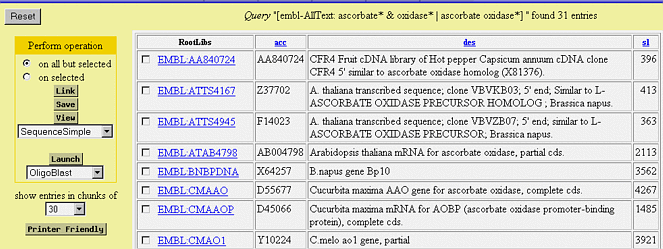
FIGURE 2. The "Entry List" page using the selected view.
From the "Extended" query form
To apply a view for an "Extended" query:
-
Select the EMBL databank checkbox from the "Top" page and click the "Extended"
button. See chapter 3, "Querying" if necessary.
-
Enter "oxidase" in the "AllText" input box.
-
Select the view that you want to apply to your query results from the drop-down
menu beside "Use view". See figure 3.
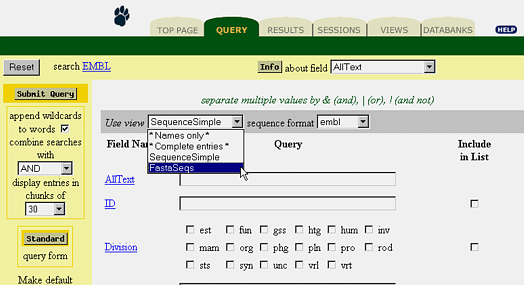
FIGURE 3. Choose a view for your "Extended" query.
-
Click the "Submit Query" button.
-
This will bring up the "Entry List" page with the results of your query
displayed using the selected view.
From the "Entry List" page
Querying, linking, and launching applications always returns the "Entry
List" page. It contains a list of the entries found that meet the requirements
specified in the operation. If you do not select a view for the results
when the operation is run the default "Names only" view is used. You have
already seen how to override the default view for the "Standard" and "Extended"
queries, later you will see how to override the default view for the "Linking"
and "Application Launch". Now, you will see how to apply a different view
to the "Entry List" page when you want to change views.
To change views in the "Entry List" page:
In the left side-margin you will see a drop-down menu below the
"View" button. See figure 4. The drop-down menu displays the name of the
view currently applied.
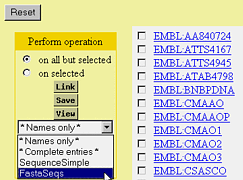
FIGURE 4. Changing views in the "Entry List" page.
-
Select the drop-down menu.
-
Scroll through the list until you find the view you want.
-
Click the view name to select it.
-
Click the "View" button.
-
The "Entry List" page will be replaced with a new "Entry List" that displays
the results using the selected view. See figure 5.
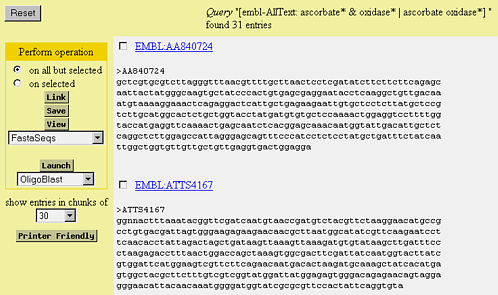
FIGURE 5. The new view in the "Entry List" page.
From the "Entry" page
To apply a view from the "Entry" page:
-
You need to be on an "Entry" page so start with the "Entry List" page from
the previous example and click the hyperlinked entry name for one of the
entries. See figure 6.

FIGURE 6. Click the entry hyperlink.
-
Select the drop-down menu that is above the entry and beside the "View"
button.
-
Scroll through the list until you find the view that you want to use for
the entry. See figure 7.
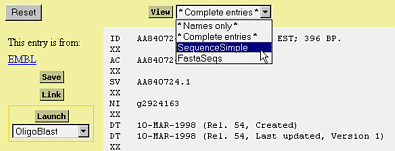
FIGURE 7. Choosing a view.
-
Click the view name to select it.
-
Click the "View" button.
-
The "Entry" page is replaced with an "Entry" page that uses the selected
view. See figure 8.

FIGURE 8. The new view.
From the "Results" page
To apply a view from the results page:
-
Select the set that you want to apply the view to.
-
Click the checkbox to the left of "Q1".
-
Select the view from the pull-down in the left margin. See figure 9.
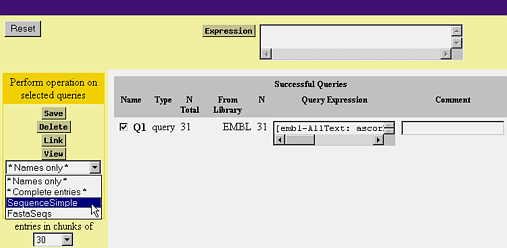
FIGURE 9. Select the view for your set.
-
Click the "View" button.
From the "Linking" page
To apply a view for the results of a linking operation from the "Linking"
page:
-
Click the "Results" tab.
-
This will bring up the "Results" page.
-
Select the checkbox to the left of "Q1".
-
Click the "Link" button.
-
This will bring up the "Linking" page.
-
Choose the databank to look for links in.
-
Select the checkbox to the left of the SWISSPROT hyperlink. See figure
10.
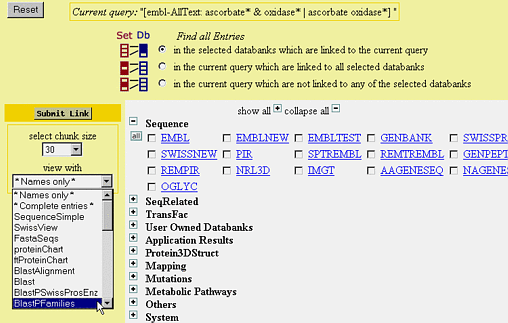
FIGURE 10. Pick a view for links.
-
Choose the view that you want to apply to the results of the linking operation,
click the drop-down menu in the left-side margin under the "Use view" heading.
-
Click the "Link" button.
From the "Application Launch" page
To choose a view for the results of an application other than the default
view:
-
From the "Results" page pick the application to run and click the "Launch"
button.
-
See chapter 6, "Applications" for more information on launching applications.
-
You will see a drop-down menu near the heading "select view to display
results". Select this drop-down menu.
-
Scroll through the list until you find the view that you want. See figure
11.
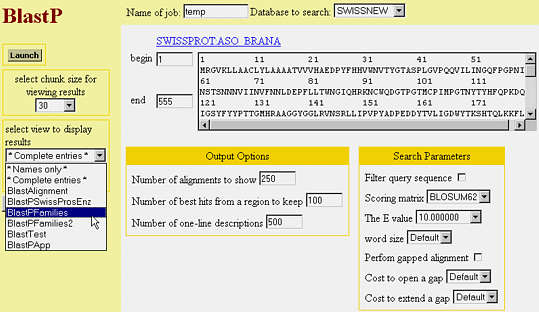
FIGURE 11. Choose a view for the application results.
-
Launch the application as usual.
-
The results of the application will be displayed in the "Entry List" page
using the view you selected.
|