|
|
|
 |
 |
| 2.2 Permanent
Sessions |
| |
To keep your work in a reliable location use the permanent
sessions option. You can swap between sessions and move work from one session
to another easily. In addition, your work is secure because no one can
access it without first going through an authentication process.
Note: Check with your SRS administrator about your site policy for
permanent sessions. They may need to create an account for you.
|
Using
the Session Manager |
| |
If you followed the steps outlined in "Starting a Permanent
Session", you will see the "Session Manager " page. See figure 3.
The "Session Manager " page provides you with the tools necessary
to manage sessions. You can move queries or views between sessions, save
and delete them, and upload or download complete sessions. Additionally,
the "Session Manager " page lets you choose the session that you want to
work in. These features are all explained throughout the rest of this section.
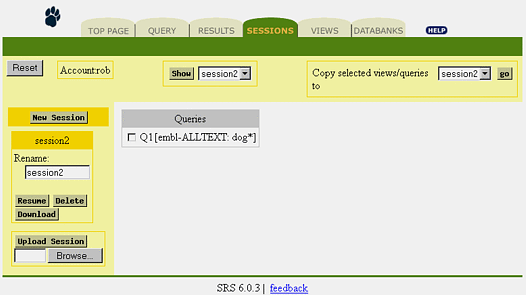
FIGURE 3. Session Manager Page.
Resume the last Session
The last session that you worked with is displayed when you login as a
permanent session user. See figure 3. To continue working on that session: |
|
|
-
Click the "Resume" button.
-
The "Top" page is displayed allowing you to begin a new query. Alternatively,
you can go to the "Results " page to continue working with the queries
you have already done. You can continue to manage the current session (as
explained in this chapter) or otherwise continue with your work as usual.
Switch to Another Session
|
|
|
Near the top of the "Session Manager " page you will see
a button labelled "Show" with a drop-down menu to the right containing
a list of your sessions. This is the permanent session history list.
To return to a session in the history list:
-
Select the drop-down menu.
-
Scroll down the list till you find the session you want.
-
Click the session name indicating your selection.
-
Click the "Show" button to switch to the selected session.
-
The details for the session you selected are now displayed in the "Session
Manager " page. You can work with the session as usual.
Begin a New Session
-
Click the "New Session" button near the top of the page.
|
|
|
-
This will begin a new session. The "Top " page is displayed so that you
can start querying databanks right away.
Managing Sessions
There are five session management features. They are:
-
Copy
-
Allows you to copy selected queries or views from one session to another.
-
Rename
-
Change the session name.
-
Delete
-
Remove a session.
-
Upload
-
Upload a session.
-
Download
-
Download a session.
Copy
Once a view is made or a query done you can copy them between sessions.
This way you can make best use of your work. You do not have to re-invent
them in each session.
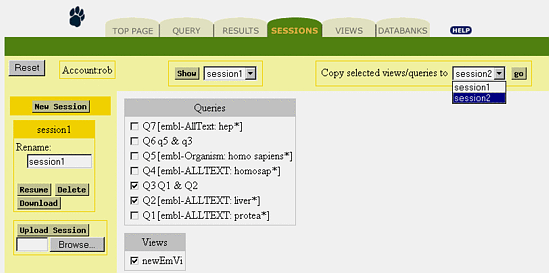
FIGURE 4. Sharing Queries/Views Between Sessions.
To share a view or query between sessions:
-
Make the session with the queries or views you want to share the current
session.
-
See the "Switch to Another Session" section earlier in this chapter.
-
Select the queries and/or views that you want to copy.
-
Click the checkbox to the left of the query or view to indicate your selection.
-
Pick the target session.
-
Near the top of the page you will see a section with "Copy selected views/queries
to".
-
Scroll through the drop-down menu until you find the session that you want
to copy the queries/views to (See figure 4).
-
Click the session name to select it.
-
Click the "go" button.
-
The selected queries and views will be copied to the target session.
Rename
The default naming convention (session1, session2, sessionN), is fine when
you will only have a few sessions in the history list. If you have several
sessions in the history list and are finding it difficult to remember which
session has your, e.g., "dog" data and which one has "cat" data, you could
give them personalized names.

FIGURE 5. Personalized Session names .
To rename a session:
-
Type the new name in the textbox labelled "Rename:".
-
Click the "go" button, which is located near the top right of the page
under the navigation bar.
-
The page will be refreshed with the new name set.
Delete
If you no longer need a particular session you can delete it.
-
Make the session that you want to delete the current session.
-
See "Switch to Another Session".
|
|
|
-
Click the "Delete" button.
Download
If you want to share a session with other users or if you want to move
your temporary session work to your permanent session list, or to another
temporary session, you will first need to download a file containing the
session work to your local disk.
To download a session:
-
Make it the current session.
-
See "Switch to Another Session".
|
|
|
-
Click the "Download" button.
-
Select "Save this file to disk" when prompted.
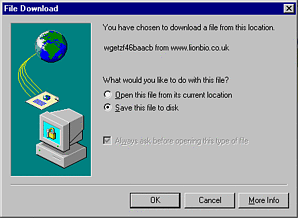
FIGURE 6. "File Download" Dialog Box.
-
Click "OK".
-
Give the session file a name.
-
To use the default name provided by SRS skip to the next step.
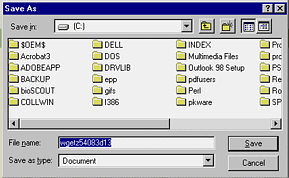
FIGURE 7. "Save As" Dialog Box.
-
Click "Save".
-
The file is now saved and ready to upload to another session.
Upload
|
|
|
Work can be shared between different users using the Upload
and Download features. You can also use these feature with a temporary
session to move work from a temporary session into your permanent session
history list or viseversa.
To upload a session from your local disk:
-
Type the file name into the textbox below the "Upload Session" button.
-
Click the "Upload Session" button.
If you do not know where the session file is:
-
Click the "Browse" button.
-
Locate the file to upload.
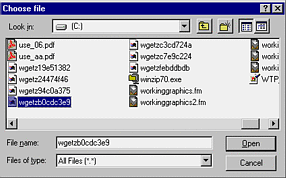
FIGURE 8. Browsing for the Session File.
-
Click "Open".
-
This will put the file name and path into the textbox.
-
Click "Upload Session".
-
This will load the session. You can start working with the session as usual.
|
 |