Using JalView
Using Jalview
Introduction
Jalview is primarily a multiple sequence
alignment (MSA) editor - however it additionally provides a wide range
of additional tools and features that supplement and support the
interpretation of an MSA.
In these notes, however, we will be focusing on using Jalview to edit
and manipulate MSAs, rather than on the extensive additional
functionality it provides.
Online
documentation and tutorials
The Jalview website
provides several different documents and pages that provide useful
information and documentation on using the tool. Particularly useful
are:
Getting Jalview
Jalview can be downloaded here
from the University of Dundee.
Overview of the Jalview
Graphical User Interface (GUI)
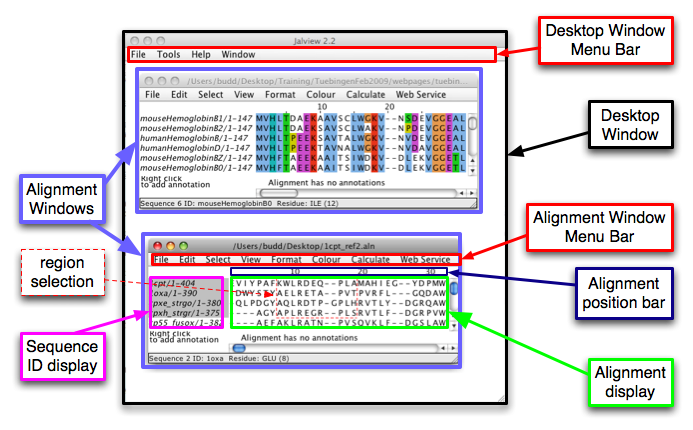
Within a session of Jalview you can open more than one
alignment, each alignment displayed and manipulated in its own
Alignment Window.
The alignment itself is displayed within the Alignment display.
Different columns in the alignment are specified by numbers describing
their position with respect to the first column in the alignment (which
is position 1). The Alignment position bar indicates the
position of the columns currently shown in the Alignment display.
This bar is also used to select ranges of columns in the alignment, and
to indicate columns in the alignment that have been selected.
The identifiers associated with the sequences shown in the Alignment
display are shown in the Sequence ID display. Clicking on
identifiers in this display can be used to select entire sequences.
Clicking and dragging within the Alignment display will define a
region selection (outlined in dashed red lines) - specific analyses
can be applied to such a region, or the region can be used to restrict
edits to given region of the alignment.
These Alignment Windows are displayed within the Desktop
Window. Other kinds of windows (e.g. displaying protein 3D
structures) will also appear within the Desktop Window -
however, we will only be working with Alignment Windows.
Both the Alignment Window and the Desktop Window are
associated with Menu Bars. Note that the menus available on the
bars of the different types of window are also different - for example,
only the Alignment Window contains an Edit Menu, the Desktop
Window doesn't have such a menu.
If you are working with only one alignment, you might want to maximise
its Alignment Window to fill the Desktop Window using
the "Maximise" button (on a Macintosh machine, this will be a green
button that shows a "+" sign on mouse-over at the top left of the
window).
Taken as a screenshot from a Macintosh machine, the image below shows
one Jalview Desktop Window within which two Alignment Windows are open.
Both Alignment Windows have an Alignment Display, Alignment position
bar, Sequence ID display, and a Menu Bar, but
these are only labeled on the lower of the two Alignment Windows.
Additionally, a region selection has been made on the lower alignment,
outlined in thin dashed red lines.

Starting Jalview -
removing automatically-opened windows
On some installations of Jalview, the software is set up to
automatically load a specified set of files on executing Jalview.
These example files can provide a useful overview of the features
available in Jalview - however, they can also take quite some time to
load, which is not ideal if you are not interested in exploring the
examples.
If this happens, you can remove all these windows using:
Desktop Window->Window->Close All
You can also specify the default
settings of the software to deselect the option that causes these
files to open automatically on starting the software:
- Desktop Window->Tools->Preferences->Visual tab
- Deselect the tick in the "Open file" box at the bottom of the
window
Opening an alignment
in Jalview
To open an alignment file stored on your local filesystem:
Desktop Window->File->Input Alignment->From File
Note that, by default, Jalview searches only for Jalview .jar-format
files - if your alignment/sequences are in some other format, you will
need to specify either the relevant format using the File Format
drop-down list in the Open local file window, or indicate that you want
to have access to All Files.
Saving an MSA to a
local file
Selecting the Menu Bar from the Alignment Window whose alignment you
want to save:
Alignment Window->File->Save As...
Specify the format of the output file using the "File Format' drop-down
box.
If you have made modifications to the appearance of the alignment that
you want to preserve for a later session of Jalview, then select the
Jalview .jar format. When re-loaded into a later session of Jalview,
this should preserve any sequence annotation, formating, etc you might
have added to the alignment.
Note that, by default, Jalview appends information about the start and
end position of the residues from a sequence that are included in the
output file.
In many contexts it is useful to provide this information in the
sequence identifier - however, for some software that you might provide
your Jalview alignment as input for, the additional characters that
this adds to the identifier cause the identifier line to be too longer,
and the inclusion of a "/" in the identifier may prevent some software
from reading the alignment as input.
To turn this feature off (by default) do the following:
- Desktop Window-> Tools->Preferences...->Output Tab
- In the "File Output" zone of the window, remove the checks from
the boxes next to the names of the different formats available
Adjust MSA display options
- wrapping the alignment, changing the
colouring scheme
By default, the alignment is displayed in one row - however, some users
prefer to examine the alignment wrapped within the alignment window.
This is also useful when using Jalview to preparing alignments for use
in figures.
To wrap the alignment, select the menu for the Alignment Window
containing your alignment, and use the following menu option:
Alignment Window->Format->Wrap
By default, the alignments displayed in Jalview are uncoloured.
To apply a colouring scheme to the alignment - for example the default
CLUSTALX scheme:
Alignment Window->Colour
and then select your colouring scheme of choice.
Creating region selections
Left click on either the top or bottom left residue you want to include
in the region selection, and drag the mouse to the residue at the
opposite corner of the region you want to select.
Note that this does not work if you begin at the top or bottom right
of the region!! You will not be able to extend the selection (at
least using your initial mouse-drag) to the left of your
initially-selected residue!!
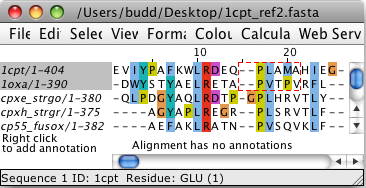
The region selection is bordered by a dashed red line.
Once initially created, the boundaries of the region selection can be
modified by clicking on one of the borders and dragging to the desired
position. However, be careful to click fairly precisely on the dashed
red line border - otherwise you will remove the initial region
selection and be creating a new one instead!
This image shows a small region
selection.
Selecting
entire/complete sequences
You can directly select a set of sequences by left-clicking on their
respective sequence identifiers in the Sequence ID display.
- Hold down CTRL to select additional sequences by clicking on the
corresponding sequence identifiers.
- Once more than one sequence is selected, hold down SHIFT to
select multiple additional sequences.
Sequences are also selected when you create a region selection -
this selects the set of sequences whose residues are included in the
region selection.
The identifiers of selected sequences are shaded grey in the Sequence
ID display - for example, in the image below, the sequences 1cpt
and 1oxa have been selected, due to the creation of a region
selection (the region enclosed in dashed red lines).

Selecting alignment
columns
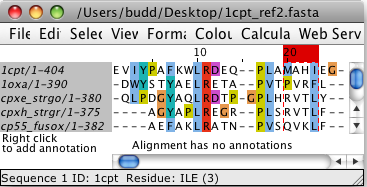
Left-click and drag with the mouse in the Alignment position bar above
the Alignment display to select the columns.
Hold down CTRL to select additional columns.
Once more than one column has been selected, hold down SHIFT and click
on another column to select all columns
that lie between the left- and right-most selected columns (including
the column selected using SHIFT)
For example, in the image below, columns 20 - 23 have been selected.

De-selecting
all selected regions/columns/sequences
To de-select all selections, use either:
- press the "Escape" key
- Alignment Window->Select->Deselect all
Removing/deleting
regions of an
MSA - particularly columns to be excluded from a phylogenetic analysis
When preparing an alignment for use in a phylogenetic analysis,
typically some columns are excluded from the analysis - as they are
suspected of containing residues from different sequences that are not
related by point substitution events.
This can be done automatically, for example using the GBLOCKS
software.
Alternatively, columns to be excluded from the analysis can be selected
"by eye" - this process can be aided by using the CLUSTALX feature to identify regions that likely
contain such misalignments.
To remove columns from an alignment using Jalview, select the columns you want to
remove and then either:
- press the "Delete" or "Backspace" key to remove the columns
- Alignment Window->Edit->Cut
The same two actions described above can also be used to delete any
other kinds of selections from the alignment i.e. both selected
sequences or regions selections can be removed in this way.
Inserting/removing
gaps in an MSA
Two situations in which you might want to manually adjust/edit an
alignment are:
- having identified regions of an alignment that could be improved
by manual adjustment/editing
- having calculated an alignment between using other methods (e.g.
using 3D structural comparison) that you want to incorporate in an
alignment
Adjusting/editing an alignment is "simply" an exercise in adding or
removing gap characters from the alignment.
Jalview provides several different ways of introducing gaps into an
alignment, as summarised on this help page.
To add gaps from a position in an alignment:
- Begin by pressing (and keeping pressed) the SHIFT key
- Left-click on the position you want to insert the gap, and drag
to the right of this position (while keeping the SHIFT key held down)
To remove gaps from a position in an alignment:
- Begin by pressing (and keeping pressed) the SHIFT key
- Left-click on the gap you want to remove, and drag to the left of
this position (while keeping the SHIFT key held down)
To add/remove gaps to several positions in an alignment at the same
time:
- Select multiple
sequences from the alignment
- Press (and keep pressed) the CTRL key
- Left click at the appropriate position, and drag to the right (to
add gaps) or to the left (to remove gaps) (while keeping the CTRL key
held down)
Note that, while several sequences are selected, you can still
add/remove gaps from a single sequence by holding down the SHIFT rather
than the CTRL key.
Changing the
order of sequences in an alignment
Select a set of sequences.
Use the up and down arrow keys to move the set of selected sequences up
and down within the alignment.
Undo function
Unlike many other MSA software (e.g. SEAVIEW or CLUSTALX), Jalview
provides an invaluable "Undo" function. Invaluable because, without it,
an alignment you have been editing for hours might, by accident, be
partially deleted, adjusted, etc. in a way that would (without "Undo"
being available) mean having to start again from scratch - something
we're all keen to avoid.
Exactly as in typical office software, this will undo the previous
action you have carried out on the alignment. Additionally, this can be
carried out several times, so that you can undo a set of changes
introduced one after the other. To use this feature do:
Alignment Window->Edit->Undo
Adjusting Jalview
Default Settings
There are many features of the Jalview interface that can be specified
as new defaults by the user such that, after changing these settings,
they will be preserved and used after the current Jalview session has
been closed and a new one started. To adjust these settings use the
following menu:
Desktop Window->Tools->Preferences
For example, this can be used to specify:
- a default colouring scheme for newly-opened alignments
- whether or not sequence identifiers in the various output
alignment formats are annotated with the start-end positions of each
sequence
Material provided by Aidan Budd


